개요
UserNotifications는 사용자에게 알림을 전달하는 기능을 제공하는 프레임워크다
Local Notifications는 앱 내부에서 생성되고, 특정 시간이나 이벤트에 따라 사용자에게 알림을 보낸다
Remote Notifications는 서버에서 APNs(Apple Push Notification service)을 통해 푸시 알림을 보낸다
후자에 대해서는 추후 애플 개발자 등록을 하게 되면 정리를 추가하겠다
해당 글의 예시에선 NotificationManager라는 클래스를 정의하여 수행하는데, 내부적으로 UNUserNotificationCenter을 이용한다
관련된 핵심 요소들을 나열하면 다음과 같다
UserNotifications
- UNUserNotificationCenter - UNUserNotificationCenter.current()
- .requestAuthorization()
- .notificationSettings().authorizationStatus
- .setNotificationCategories(UNNotificationCategory)
- .add(UNNotificationRequest)
- .pendingNotificationRequests()
- .removeAllPendingNotificationRequests()
- .removePendingNotificationRequests(withIdentifiers:)
- UNNotificationCategory
- [UNNotificationAction]
- UNNotificationRequest
- UNTimeIntervalNotificationTrigger
- UNNotificationContent / UNMutableNotificationContent
- UNNotificationAttachment
- UNNotificationResponse
- UNNotificationResponse.notification.request = UNNotificationRequest
- UNUserNotificationCenterDelegate
- func userNotificationCenter(_:willPresent:) async -> UNNotificationPresentationOptions
- func userNotificationCenter(_:didReceive:) async
관련된 내용들이 위와 같이 많은데, 지금부터 각 내용들에 대해 전부 정리한다
권한 처리
- info - “Privacy - User Notifications Usage Description”
- UNUserNotificationCenter
- .requestAuthorization(options:)
- .notificationSettings().authorizationStatus
권한 처리는 늘 먹던 맛이다
우선 UNUserNotificationCenter는 .current()로 객체를 얻을 수 있다(아마 싱글톤이라 그러지않을까?)
이후 .requestAuthorization 메서드를 통해 권한을 요청하고, .notificationSettings().authorizationStatus를 통해 권한 상태를 얻을 수 있다
import UserNotifications

@MainActor
class NotificationManager: ObservableObject {
    private let notificationCenter: UNUserNotificationCenter
    @Published var isAuthorized: Bool = false
    @Published var pendingRequests: [UNNotificationRequest] = []

    init() {
        self.notificationCenter = .current()
    }

    func requestAuthorization() async {
        guard !isAuthorized else { return }
        do {
            try await notificationCenter
				.requestAuthorization(options: [.sound, .badge, .alert])
        } catch {
            print(error)
        }
    }

    func getAuthorizationStatus() async {
        let currentSettings = await notificationCenter.notificationSettings()
        isAuthorized = (currentSettings.authorizationStatus == .authorized)
    }
}
또한 추가적으로 현재 앱의 알림 권한 상태를 아래처럼 scenePhase를 통해 앱의 전환 마다 확인해줘야 한다
@main
struct LearnUserNotificationsApp: App {
    @Environment(\.scenePhase) var scenePhase
    @StateObject var notificationManager: NotificationManager = .init()

    var body: some Scene {
        WindowGroup {
            ContentView()
                .task {
                    await notificationManager.requestAuthorization()
                }
                .onChange(of: scenePhase, { _, newValue in
                    if newValue == .active {
                        Task {
                            await notificationManager.getAuthorizationStatus()
                        }
                    }
                })
                .environmentObject(notificationManager)
        }
    }
}
UNUserNotificationCenterDelegate
- func userNotificationCenter(_:willPresent:) async -> UNNotificationPresentationOptions
- func userNotificationCenter(_:didReceive:) async
알림 발생과 이것에 상호작용할 때 관련된 동작은 UNUserNotificationCenterDelegate를 이용한다
이를 채택하기 위해 우선 기존 NotificationManager를 다음과 같이 NSObject를 채택하도록 고친다
@MainActor
class NotificationManager: NSObject, ObservableObject {
    private var notificationCenter = UNUserNotificationCenter.current()
    @Published var isAuthorized: Bool = false
    @Published var pendingRequests: [UNNotificationRequest] = []

    override init() {
        super.init()
        self.notificationCenter.delegate = self
	}

	/// 권한처리...
}
아래 UNUserNotificationCenterDelegate에서
첫 번째 메서드는 알림이 어떻게 전달될지 설정을 하는 메서드고,
두 번째 메서드는 알림을 눌렀을 때 수행되는 메서드다
extension NotificationManager: UNUserNotificationCenterDelegate {
	// 1) foreground일 때, 알림이 발생하면 앱에서 수행되는 동작되는 메서드
    func userNotificationCenter(_ center: UNUserNotificationCenter, willPresent notification: UNNotification) async -> UNNotificationPresentationOptions {
				return [.sound, .banner]
	}

    // 2) 알림 창을 누르면 이를 바탕으로 앱에서 수행되는 동작
    func userNotificationCenter(_ center: UNUserNotificationCenter, didReceive response: UNNotificationResponse) async {
	    /// response.actionIdentifier로 categoryIdentifier를 식별할 수 있고,
        /// response.notification.request로 UNNotificationRequest에 대한 정보를 얻는다
    }
}
알림을 누르면 두 번째 메서드가 수행되는데, 이때 인자의 reponse는 발생한 알림에 대한 정보를 얻는데 이용된다
우선 UNNotificationResponse는 .categoryIdentifier를 가지고 있어서 해당 알림이 어떤 카테고리로 발생했는지 알 수 있다
또한 UNNotificationResponse.notification.request를 통해 UNNotificationRequest를 얻을 수 있는데,
이를 통해 Request의 content를 얻어 .userInfo에 접근할 수 있다
해당 Delegate 메서드에서 .userInfo로 얻은 데이터를 바탕으로 네비게이션에 이용하던지, .categoryIdentifier로 등록된 카테고리의 액션을 수행시킬 수 있다
이와 관련해서는 "UNNotificationContent 더 알아보기"에서 자세히 설명한다
알림 생성
- UNUserNotificationCenter.add(UNNotificationRequest)
- UNNotificationRequest(identifier:content:trigger:)
- content - UNNotificationContent
- trigger - UNNotificationTrigger
알림 생성과 관련해서는 UNNotificationRequest가 핵심이다
이를 UNUserNotificationCenter의 .add 메서드에 인자로 UNNotificationRequest를 전달하면 알림을 발생시킨다
UNNotificationRequest(identifier:content:trigger:)
- UNNotificationRequest(identifier:content:trigger:)
- identifier - String
- content - UNNotificationContent
- trigger - UNNotificationTrigger
UNNotificationRequest는 다음과 같이 3가지 요소로 구성된다
identifier는 알림의 식별자이고, content는 알림과 내용들을 나타내고, trigger는 알림이 발생하는 조건을 정의한다
content와 trigger 생성 후 Request를 생성하고, 이를 NotificationCenter에 추가하면 알림을 발생시킬 수 있다
우선 이와 같은 전체적인 알림 생성 과정을 간략하게 표현해 보면 아래 예시코드와 같다
extension NotificationManager {
    func schedule(timeInterval: Double) async {
		/// content 생성
        let content = UNMutableNotificationContent()

        /// trigger 생성
        let trigger = UNTimeIntervalNotificationTrigger(timeInterval: timeInterval, repeats: false)

        /// NotificationRequest 생성
        let request = UNNotificationRequest(identifier: UUID().uuidString, content: content, trigger: trigger)

        /// add 메서드를 통해 NotificationRequest 추가
        try? await notificationCenter.add(request)
    }
}
이제부턴 UNNotificationRequest을 이루는 핵심요소인 content와 trigger에 대해 정리한다
content - UNNotificationContent
- UNNotificationContent / UNMutableNotificationContent
- title, subtitle
- body
- attachment - 멀티미디어 파일 사용
- userInfo - 알림 시 데이터 전달에 이용
- categoryIdentifier - 알림 카테고리(=액션모음) 지정
UNNotificationRequest에서 content로 사용되는 UNNotificationContent는 위와 같은 요소들을 가지고 있다
일단 간단한 알림 요청 컨텐츠를 생성하는 과정을 간략하게 보여주고,
이후에 다시 content의 속성인 attachment, userInfo, categoryIdentifier를 활용하는 예시를 설명한다
content를 만들 때, 보통은 다음과 같이 UNMutableNotificationContent로 객체를 생성하고 값을 설정한다
extension NotificationManager {
    func schedule(timeInterval: Double) async {
        let content = UNMutableNotificationContent()
        content.title = "Hello"
        content.body = "This is a test notification"
        content.sound = .default

		/// trigger 생성

        /// NotificationRequest 생성

        /// add 메서드를 통해 NotificationRequest 추가
    }
}
trigger - UNNotificationTrigger
- UNNotificationTrigger
- UNTimeIntervalNotificationTrigger
- UNTimeIntervalNotificationTrigger
- UNLocationNotificationTrigger
- UNPushNotificationTrigger
content에 이어서 UNNotificationRequest(identifier:content:trigger:)를 만들기 위해, trigger를 생성한다
UNNotificationRequest 생성 인자로 trigger=nil을 전달하면, 바로 알림이 발생하게 된다
UNTimeIntervalNotificationTrigger을 이용하면 특정 시간(timeInterval) 후에 알림이 나타나는데
특정 시점마다 알림을 발생시키려면 UNCalendarNotificationTrigger를 통해 trigger를 만든다
또한 특정 위치에 들어서거나 나갈 때마다 알림을 발생시키는 UNLocationNotificationTrigger도 존재한다
UNPushNotificationTrigger의 경우 APNs와 관련된 trigger로 나중에 관련 글을 작성 시 설명할 것이다
아래 예시 코드에서는 간단하게 UNTimeIntervalNotificationTrigger를 이용하여 trigger를 작성했다
- UNTimeIntervalNotificationTrigger(timeInterval:repeats:)
extension NotificationManager {
    func schedule(timeInterval: Double) async {
        let content = UNMutableNotificationContent()
        content.title = "Hello"
        content.body = "This is a test notification"
        content.sound = .default

        let trigger = UNTimeIntervalNotificationTrigger(timeInterval: timeInterval, repeats: false)

        /// NotificationRequest 생성

        /// add 메서드를 통해 NotificationRequest 추가
알림 불러오기 및 삭제
- UNUserNotificationCenter
- .pendingNotificationRequests()
- .removePendingNotificationRequests(withIdentifier:)
- .removeAllPendingNotificationRequests()
.pendingNotificationRequests() 메서드를 통해, 현재 등록된 알림들을 불러올 수 있고, .removePendingNotificationRequests(withIdentifier:) 메서드는 등록된 알림을 개별적으로 삭제하고,
.removeAllPendingNotificationRequests() 메서드는 전체 등록된 알림을 삭제한다
extension NotificationManager {
    func fetchPendingRequests() async {
        pendingRequests = await notificationCenter.pendingNotificationRequests()
    }

    func removeRequest(withIdentifier identifier: String) {
        notificationCenter.removePendingNotificationRequests(withIdentifiers: [identifier])
        if let index = pendingRequests.firstIndex(where: {$0.identifier == identifier}) {
            pendingRequests.remove(at: index)
        }
    }

    func clearRequests() {
        notificationCenter.removeAllPendingNotificationRequests()
    }
}
UNNotificationContent 더 알아보기
UNNotificationRequest를 만들 때, content로 UNNotificationContent를 만든다
이제부턴 이때 UNNotificationContent의 속성들인 userInfo, attachments, categoryIdentifier에 대해 자세히 알아본다
userInfo나 categoryItentifier의 경우, 아래와 같이 알림을 만들 때 얻은 정보를 바탕으로 Delegate 메서드가 수행되면 알맞은 처리를 해준다
extension NotificationManager: UNUserNotificationCenterDelegate {
    func userNotificationCenter(_ center: UNUserNotificationCenter, didReceive response: UNNotificationResponse) async {
        /// response.notification.request.content.uesrInfo로 userInfo 데이터를 얻을 수 있다
        let userInfo = response.notification.request.content.userInfo
        if let customData = userInfo["customDataKey"] as? String {
            print("Custom data received: \(customData)")
        }

        /// response.actionIdentifier를 사용하여 카테고리의 어떤 액션이 선택되었는지 확인할 수 있다
        switch response.actionIdentifier {
        case UNNotificationDefaultActionIdentifier:
            print("Default action triggered")

        case "SNOOZE_ACTION":
            print("Snooze action triggered")

        case "DELETE_ACTION":
            print("Delete action triggered")

        default:
            break
        }
    }
}
categoryIdentifier
- UNUserNotificationCenter
- .setNotificationCategories(UNNotificationCategory)
- UNNotificationCategory(identifier:actions:intentIdentifiers:options:)
- UNNotificationAction(identifier:title:options:)
categoryIdentifier를 설명하기 앞서, UNNotificationCategory와 UNNotificationAction를 설명하고 이를 등록하는 것에 대해 정리한다
UNNotificationAction은 iOS에서 사용자가 알림에 대해 수행할 수 있는 특정 동작을 나타낸다
이는 사용자 인터페이스에서 버튼으로 표시되며, 사용자가 알림을 받았을 때 즉시 반응할 수 있는 방법을 제공한다
UNNotificationCategory는 관련된 알림 액션들의 그룹을 정의하여, 특정 유형의 알림에 대해 어떤 액션들이 제공되어야 하는지를 시스템에 알려준다
아래는 UNNotificationCategory인 "ALARM_CATEGORY”를 생성하여 등록하는 메서드를 객체 생성 시 수행하는 코드다
우선 UNNotificationAction인 "SNOOZE_ACTION"과 "DELETE_ACTION"을 정의하고,
이를 알림 카테고리로 만든 후에 UNUserNotificationCenter.setNotificationCategories(UNNotificationCategory)로 등록한다
@MainActor
class NotificationManager: NSObject, ObservableObject {
	/// ...

	override init() {
        super.init()
        self.notificationCenter.delegate = self
        setNotificationCategories()
    }

    func schedule(timeInterval: Double) async {
        let content = UNMutableNotificationContent()
        /// 설정한 카테고리 ID 지정
        content.categoryIdentifier = "ALARM_CATEGORY"

        let request = UNNotificationRequest(identifier: UUID().uuidString, content: content, trigger: nil)

        try? await notificationCenter.add(request)
    }
}

extension NotificationManager: UNUserNotificationCenterDelegate {
    private func setNotificationCategories() {
        let snoozeAction = UNNotificationAction(identifier: "SNOOZE_ACTION",
                                                title: "Snooze",
                                                options: [])

        let deleteAction = UNNotificationAction(identifier: "DELETE_ACTION",
                                                title: "Delete",
                                                options: [.destructive])

        let category = UNNotificationCategory(identifier: "ALARM_CATEGORY",
                                              actions: [snoozeAction, deleteAction],
                                              intentIdentifiers: [],
                                              options: [])
        /// "ALARM_CATEGORY" 설정
        notificationCenter.setNotificationCategories([category])
    }
}
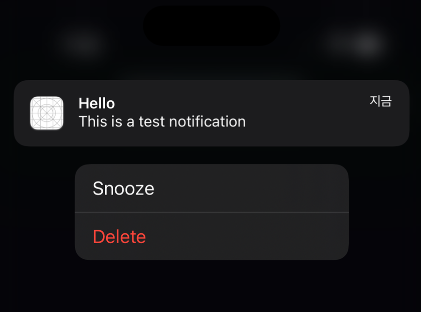
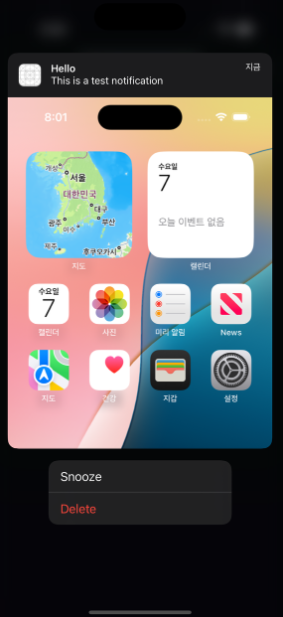
위와 같이 카테고리가 등록된 알림이 요청되면, 알림을 길게 눌렀을 때 해당 카테고리의 액션들이 옵션으로 나타난다
이렇게 등록한 카테고리는 알림 창을 누르면 수행되는 Delegate 메서드에서 다음과 같이 작성하면
schedule 메서드에서 카테고리를 지정한 알림 카테고리의 액션에 따라 구분해서 처리할 수 있다
extension NotificationManager {
    func schedule(timeInterval: Double) async {
        let content = UNMutableNotificationContent()
        /// 설정한 카테고리 ID 지정
        content.categoryIdentifier = "ALARM_CATEGORY"

        let request = UNNotificationRequest(identifier: UUID().uuidString, content: content, trigger: nil)

        try? await notificationCenter.add(request)
    }
}

extension NotificationManager {
    func userNotificationCenter(_ center: UNUserNotificationCenter, didReceive response: UNNotificationResponse) async {
        /// response.actionIdentifier를 사용하여 카테고리의 어떤 액션이 선택되었는지 확인할 수 있다
        switch response.actionIdentifier {
        case UNNotificationDefaultActionIdentifier:
            print("Default action triggered")

        case "SNOOZE_ACTION":
            print("Snooze action triggered")

        case "DELETE_ACTION":
            print("Delete action triggered")

        default:
            break
        }
    }
}
알림에 나타난 버튼을 누르면 누른 버튼을 response.actionIdentifier으로 구분하여 print문이 출력된다
attachment
attachment는 미디어파일을 알림에 추가하는데 이용된다
다음과 같이 파일 정보를 얻고, 이를 UNNotificationAttachment로 만들어서 attachments에 설정하면 된다
extension NotificationManager {
    func schedule(timeInterval: Double) async {
        let content = UNMutableNotificationContent()
        content.title = "Hello"
        content.body = "This is a test notification"
        content.sound = .default

        /// 멀티미디어 파일 등록
        if let url = Bundle.main.url(forResource: "screenshot", withExtension: "png") {
            if let attachment = try? UNNotificationAttachment(identifier: "screenshot", url: url) {
                content.attachments = [attachment]
            }
        }

		/// trigger 생성

        /// NotificationRequest 생성

        /// add 메서드를 통해 NotificationRequest 추가
	}
}
아래와 같이 이미지가 알림에 포함되어 나타난다

uesrInfo
userInfo는 알림으로 데이터를 전달하는 데 사용되는 속성이다
예시 프로젝트에선 문자열을 넘겨서 이를 바탕으로 View를 선택하여 sheet 수정자를 실행시켰다
extension NotificationManager: UNUserNotificationCenterDelegate {
    // foreground가 아닐 때, 알림 창을 누르면 이를 바탕으로 앱에서 수행되는 동작
    func userNotificationCenter(_ center: UNUserNotificationCenter, didReceive response: UNNotificationResponse) async {
        /// 알림에 포함된 데이터를 userInfo를 통해  처리
        let userInfo = response.notification.request.content.userInfo
        if let sheetViewData = userInfo["sheetView"] as? String {
            sheetView = SheetView(rawValue: sheetViewData)
        }

        /// response.actionIdentifier를 사용하여 어떤 액션이 선택되었는지 확인한다...
    }
}
프로젝트

마무리
이 글에서는 UserNotifications에 대해 정리해 봤다
글 초반부에 키워드들을 정리한 부분에서 좀 더 핵심 요소만 추려서 정리해 보면 다음과 같다
- UNUserNotificationCenter
- 알림 권한 요청 및 확인
- 알림 불러오기와 삭제
- 알림 카테고리 설정
- 알림 생성(.add)
- UNNotificationRequest
- 알림 생성 시 사용되는 요청
- content(UNNotificationContent)
- trigger(UNTimeIntervalNotificationTrigger)
- UNNotificationContent
- 알림 내용
- title, body, sound
- attachment - 멀티미디어 파일 사용
- userInfo - 알림 시 데이터 전달에 이용
- categoryIdentifier - 알림 카테고리 지정
- UNTimeIntervalNotificationTrigger
- 알림이 어떤 조건에서 발생할지 설정
- UNNotificationCategory
- 알림 액션들의 그룹을 정의하여 알림에 대해 어떤 액션들이 제공되어야 하는지를 시스템에 알려줌
- Manager 객체 생성 시 .setNotificationCategories을 통해 알림 카테고리가 등록되어야 함
- 알림 액션(UNNotificationAction)들로 구성됨
- UNUserNotificationCenterDelegate
- 알림을 어떻게 수행할지 설정(필수)
- 알림을 눌렀을 때, 어떤 동작이 수행될지 설정
'iOS+' 카테고리의 다른 글
| 앱 배포 관련 정리(macOS) (1) | 2024.08.31 |
|---|---|
| Cannot preview in this file (0) | 2024.08.18 |
| EventKit (0) | 2024.08.03 |
| MapKit (1) | 2024.07.27 |
| AVFoundation (0) | 2024.07.14 |


